This appears
difficult at first but it's really not. Follow along closely and
I'll show how easy it is to make an object appear Metalic.
|
 |
Step 1:
50% Grey
Whatever
your object is..start with a flat fill of 50% grey
|
 |
Step 2:
Selection Samba
1) Using the rectangular Marquee tool Make a "banded"
selection horizontally across the object. Hold down shift and
creat several more marquee selections of varying size across the
object.
2) "feather" the selections by 5 pixels (keyboard shortcut
alt+ctrl D ..cmd+opt D for mac users)
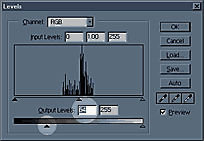
3) Open the levels dialog box(ctrl L) and increase the black output
slider to about 64. Click ok.
4) with you keyboards arrows. move the selection down about 8
taps and invert it (ctrl+i)
|
 |
Step 3:
Double check
Your object
should look something like this now. You can probably get the
same effect by holding shift and airbrushing dark bands across
the object. It's up to you...just make sure the object is all
greyscale and banded like you see here.
|
 |
Step 4:
Bevel it
If you have Photoshop 5 or higher. Add a bevel using layer effects.
Once you have created the bevel...make a new blank layer beneath
the object and merge the object layer down with the blank layer...this
fuses the effect to the object so we can do step 5.
If you are using eyecandy...just make a nice bevel and join us
on step 5.
|
 |
Step 5:
Curve it
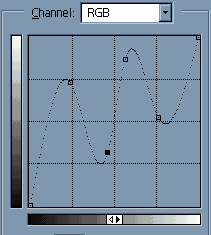
Here's the magic. With your object layer selected. Open your curves
dialog box (keyboard shortcut ctrl+M) and make a curve kinda like
you see here. Just click on the diagonal line and drag up and
down.
|
 |
Step 5:
Double Check 2
You should now look something like this. Neat eh? but it's still
missing a little something.
|
 |
Step 5:
colorize it
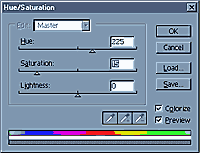
Hit Ctrl+U to bring up your hue & saturation dialog box. Click
on the "Colorize" box on the lower right and slide hue
to about 225 and saturation down to about 15. This will make the
metal kind of blueish. You can color it however you want though.
Click OK
|
 |
Step 6:
sharpen it
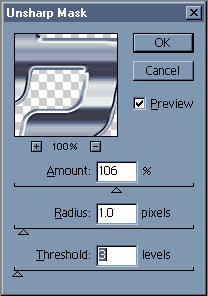
I know the filter is called "Unsharp" but it does just
the opposite. Run the filter with settings similar to what you
see here and it will make the darker parts of the chrome "pop"
out a bit and lend an air of realism to the whole effect.
|
 |
Step 7:
drop shadow and completion
There ya go! A drop shadow...maybe a few lensflares and you have
a cool chrome object and you never had to resort to a 3D application.
|

