 |
Scanning
Line Art:
To help your
final scan..make sure your line art is as clean as possible..garbage
in , garbage out. Here I have an inked drawing I scanned in greyscale
at 300dpi (reduced to 72dpi for web loading purposes) The lineart
is fairly clean but a bit grey and some of the pencil smudging
is still visable from my lousy erasing job.
|
 |
Adjust
the lineart
The trick
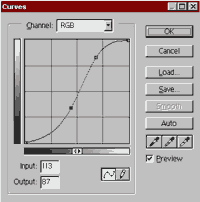
to getting a good clean blackline out of a greyish scan is to
get good with the "Curves" dialog box. Hit "Ctrl
M" or Command M for Mac. click on the diagonal line in 2
places and drag it into an "S" shape like you see here.
I pull the lower part down to increase the black values while
pulling up on the upper part to drop out the greys and straggly
lines. Watch your lineart while you do this so you can adjust
the curve accordingly...try it..it'll make more sense when you're
actually doing it.
|
 |
Results
See how much
crisper it is already? At this point you can make an alpha channel
out of it or just copy it to it's own layer and change the layer
mode to "Multiply" and paint on a layer beneath it.
The Multiply mode makes the white transparent. Refer to the Blending
Modes and Coloring Lineart
tutorials for more details
It's ok for most folks to stop at this step. If you have Adobe
Streamline, you can continue to the next step.
|
 |
StreamLine
If I am converting my line art to Vector format in Streamline
(which I highly recommend doing if you have the software) I scan
the lineart at 600 dpi...do steps 1 and 2 to clean up the scan
then import it into Streamline. I choose the "Inked drawing"
default settings and tweak the threshold allowance until I get
a nice rich line. I'll take the vector lineart into Adobe Illustrator
for some final adjustments if necessary then Place the vector
EPS into Photoshop for coloring
|


